
Ever wondered how to make a stunning dessert without turning on the oven? No-bake cheesecake cups are your secret weapon for creating amazing treats that impress everyone at gatherings.
These recipes mix creamy cheesecake with the ease of individual servings. They’re perfect for dinner parties or a quick dessert craving. No-bake cheesecake cups are simple yet gourmet.
Imagine a rich dessert without oven use, long kitchen hours, or hard baking. These cups solve these problems. They offer a stress-free, delicious dessert experience.
Key Takeaways
- No baking required for delicious cheesecake cups
- Perfect for individual portion control
- Quick and easy to prepare
- Versatile dessert for any occasion
- Customizable with various toppings and flavors
Why These Individual Cheesecake Cups Are Perfect for Any Occasion
Mini cheesecakes have changed the way we serve desserts. They turn big recipes into easy-to-eat treats that everyone loves. These small desserts are great for any event, big or small.
When you’re planning your next event, think about these bite-sized wonders:
Perfect Portion Control
Individual cheesecake cups make serving sizes easy. Guests can enjoy a sweet treat without eating too much. Each mini cheesecake is a perfect size, looking good and feeling special.
- Precise serving sizes
- Reduce food waste
- Accommodate different dietary needs
Make-Ahead Convenience
Preparing handheld desserts ahead of time is a big help for busy hosts. You can make these mini cheesecakes days before your event. This saves you from last-minute stress and lets you enjoy the party more.
- Refrigerate up to 3 days ahead
- Easy to transport
- Simple to store
Crowd-Pleasing Appeal
Mini cheesecakes are versatile and can be made in many flavors. They cater to everyone’s taste, whether they like classic or new flavors. These individual desserts are a hit with all your guests.
Pro tip: Prepare multiple flavor variations to ensure all your guests find a treat they love!
Essential Ingredients for No-Bake Cheesecake Cups
Making delicious cream cheese delights is easy. Just a few simple ingredients can turn into creamy cheesecake bites that everyone will enjoy.
The secret to these no-bake treats is using high-quality, fresh ingredients. Your choice of ingredients will make all the difference in creating irresistible desserts.
Key Ingredients for the Filling
- Cream cheese: Use full-fat, room temperature Philadelphia cream cheese for the richest texture
- Powdered sugar for smooth sweetness
- Heavy whipping cream for light, airy consistency
- Pure vanilla extract for depth of flavor
Crust Components
- Graham crackers
- Unsalted butter
- Optional: granulated sugar for extra sweetness
Professional bakers know that ingredient quality is key. When making your cream cheese delights, choose fresh, premium ingredients. This ensures the most decadent creamy cheesecake bites.
Your no-bake cheesecake cups will come together quickly with these straightforward ingredients. The secret is in the precise mixing and chilling technique. It turns simple components into an elegant dessert.
Kitchen Tools and Equipment Needed
Making bite-sized cheesecakes is easier with the right tools. Whether you bake at home or love desserts, the right equipment makes it simple.
Start by getting the essential tools for making these tasty treats. They help you make perfect individual desserts every time.
Basic Equipment Requirements
To make your bite-sized cheesecake cups, you’ll need some basic kitchen tools:
- Large mixing bowl
- Hand mixer or whisk
- Measuring cups and spoons
- Rubber spatula
- Small dessert cups or mason jars
Optional Tools for Professional Results
For better portable cheesecake cups, consider these tools:
- Electric stand mixer
- Piping bags and tips
- Kitchen scale for precise measurements
- Offset spatula
Storage Containers
Choosing the right storage is key for fresh bite-sized cheesecakes. Airtight containers keep them fresh and prevent contamination.
- 1-cup jelly jars
- ½ cup small mason jars
- Plastic dessert cups with tight-fitting lids
- Clear glass containers with sealing capabilities
Quality tools turn your portable cheesecake cups into impressive treats. They’ll wow at any gathering.
Creating the Perfect Graham Cracker Crust Base
The base of any no-bake treat is key. A crisp, buttery graham cracker crust is essential. It contrasts beautifully with creamy cheesecake cups.
Choosing the right ingredients is vital for a great crust. You need three main things:
- Graham cracker crumbs
- Melted butter
- Granulated sugar
The right mix of these ingredients is crucial. Texture is everything in making your crust. It should hold together but not be too dense or soggy.
| Ingredient | Quantity | Purpose |
| Graham Cracker Crumbs | 1½ cups | Creates crisp base |
| Unsalted Butter | ⅓ cup | Binds ingredients |
| Granulated Sugar | 3 tablespoons | Adds sweetness |
To press the crust into containers, use a spoon or a flat-bottomed cup. Press gently and evenly. Then, refrigerate for at least 15 minutes before adding the cheesecake filling.
Pro tip: Add a pinch of cinnamon or use brown sugar for extra flavor. Your no-bake treats will love it!
How to Make the Creamy Cheesecake Filling
Making the perfect filling for your no-bake cheesecake cups is all about precision and care. The secret to creamy cheesecake bites is blending ingredients just right. This creates a smooth, delightful texture that melts in your mouth.
Success with no-bake cheesecake cups starts with a few key steps. Soft, room-temperature ingredients are essential for that creamy consistency.
Cream Cheese Preparation Tips
- Remove cream cheese from refrigerator 30-45 minutes before mixing
- Use full-fat cream cheese for richest flavor
- Ensure cream cheese is completely smooth before adding other ingredients
- Avoid over-mixing to prevent grainy texture
Whipping Technique for Perfect Texture
Whipping your ingredients turns them into extraordinary creamy cheesecake bites. Use an electric mixer on medium speed. This adds air and makes the filling light and fluffy.
- Beat heavy whipping cream until stiff peaks form
- In separate bowl, mix cream cheese until completely smooth
- Gradually combine whipped cream and cream cheese
- Fold gently to maintain volume
Combining Ingredients Successfully
The secret to amazing no-bake cheesecake cups is blending ingredients gently. Patience is crucial when mixing your filling. This keeps its delicate structure intact.
- Use a spatula for folding
- Mix at low speed
- Stop mixing when ingredients are just combined
- Avoid overmixing to prevent deflating the mixture
Assembly and Presentation Tips

Making beautiful handheld desserts needs careful assembly and smart presentation. Your portable cheesecake cups will impress everyone when you use a few key techniques. These techniques turn simple ingredients into stunning treats.
Begin by getting your piping tools ready for a professional look. Choose a piping bag or a large ziplock bag with a sharp corner. Cut a small opening to pipe smoothly and control the filling.
- Use a steady hand when piping the cheesecake mixture
- Keep layers even and consistent
- Aim for clean, precise edges
Layering is key for visually appealing portable cheesecake cups. Start with a firm graham cracker base. Then, pipe your creamy filling carefully. Make sure each layer is distinct yet works well together.
| Assembly Step | Recommended Technique |
| Crust Preparation | Press firmly into cup base |
| Filling Application | Pipe in smooth, continuous motion |
| Topping Placement | Garnish with precision |
For a fancy look, use clear plastic cups or mason jars. These containers highlight your layers. They turn simple handheld desserts into elegant treats that will wow everyone.
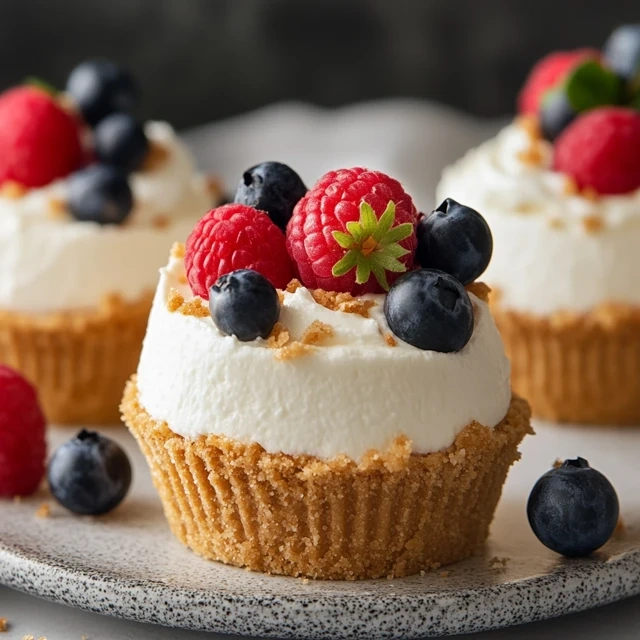
Creative Topping Ideas and Variations
Make your cream cheese delights stand out with amazing toppings. These can turn simple mini cheesecakes into unforgettable desserts. The right garnish can make these treats truly special.
Fresh Fruit Options
Fresh fruits bring color and sweetness to your mini cheesecakes. Here are some great choices:
- Mixed berries (strawberries, raspberries, blueberries)
- Tropical fruits like mango or passion fruit
- Sliced kiwi or mandarin orange segments
- Caramelized peaches or grilled pineapple chunks
Sweet Sauce Combinations
Try these amazing sauces on your cream cheese delights:
| Sauce Type | Flavor Profile | Best Paired With |
| Salted Caramel | Rich, buttery | Chocolate mini cheesecakes |
| Raspberry Coulis | Tart, bright | Vanilla mini cheesecakes |
| Chocolate Ganache | Intense, smooth | Plain cheesecake base |
Decorative Elements
Turn your mini cheesecakes into stunning desserts with these touches:
- Chocolate shavings
- Edible flower petals
- Crushed nuts
- Mint leaves
- Gold leaf for elegant presentation
Remember, creativity is key to making impressive mini cheesecakes. Feel free to mix and match toppings to create your own unique dessert. It will surely impress your guests.
Storage and Make-Ahead Instructions
Making no-bake cheesecake cups is easy, but keeping them fresh is key. Smart storage helps keep their texture and taste perfect. This way, your treats stay fresh for parties or when you just want a sweet fix.
There are great ways to store your no-bake treats in the fridge. Here are some top tips:
- Use airtight glass jars with secure lids
- Wrap individual cups tightly with plastic wrap
- Store in sealed containers with snap-on lids
Keeping your desserts in the fridge is essential. Your cheesecake cups will stay good up to 3-4 days if stored right.
| Storage Method | Recommended Duration | Best Practices |
| Refrigerator Storage | 3-4 days | Keep covered, away from strong-smelling foods |
| Freezer Storage | Up to 2 weeks | Use freezer-safe containers, thaw in refrigerator |
For the best taste, make your no-bake treats a day ahead. This lets the flavors mix well. Before serving, take the cups out of the fridge for 10-15 minutes to warm up.
Pro tip: Mark your containers with the date you made them. This helps you know when they’re at their freshest.
Troubleshooting Common Issues

Making perfect no-bake cheesecake cups can be tricky. But with a few expert tips, you’ll get it right in no time. Knowing common challenges helps you avoid problems and get delicious results every time.
Setting issues are the most common problem with no-bake cheesecake cups. Your filling needs to chill properly to get the right consistency. Here are some key tips to help:
- Refrigeration Time: Always chill for 6-8 hours minimum to set properly
- Use full-fat cream cheese for best texture
- Ensure ingredients are room temperature before mixing
- Avoid overmixing, which can create air bubbles
If your cheesecake filling doesn’t firm up, check these possible causes:
- Insufficient gelatin or stabilizer
- Incorrect cream cheese temperature
- Not chilling long enough
- Using low-fat dairy products
Crust problems can also mess up your no-bake cheesecake cups. Press the graham cracker mixture firmly into cups and chill before adding the filling. If your crust crumbles, try adding a bit more melted butter to help it stick together.
To get smooth, crack-free creamy cheesecake bites, mix ingredients gently. Avoid overworking the filling. A hand mixer on low speed is best for achieving that silky texture.
Serving Suggestions for Special Occasions
Your bite-sized cheesecakes are about to become the star of every celebration! These handheld desserts are perfect for all kinds of gatherings. They’re great for both small family events and big social parties.
Here are some creative ways to serve your no-bake cheesecake cups:
- Birthday Parties: Create a colorful dessert bar with multiple flavor options
- Bridal Showers: Arrange bite-sized cheesecakes on elegant tiered stands
- Holiday Gatherings: Decorate with seasonal toppings and garnishes
- Corporate Events: Offer professional, portion-controlled treats
How you present these desserts is key. Use decorative mini cups or clear shot glasses. This will highlight the layers and make them look great.
| Occasion | Recommended Presentation | Topping Suggestions |
| Summer Picnic | Mason jars with lids | Fresh berries, mint leaves |
| Winter Celebration | Festive mini cups | Crushed peppermint, chocolate drizzle |
| Afternoon Tea | Vintage china cups | Edible flowers, light fruit compote |
Make sure to match your cheesecakes’ flavors and decorations to the event theme. This will make a big difference!
Conclusion
Making delicious no-bake cheesecake cups is super easy. These simple desserts are perfect for any party, turning your kitchen into a sweet spot. You can impress everyone with little effort, showing that fancy desserts don’t need to be hard to make.
No-bake cheesecake cups are great because they fit any event. They’re perfect for a quick get-together or a big celebration. You can try different toppings to make each batch special and fun.
These treats are perfect for anyone who loves to cook. They’re quick to make, easy to prepare ahead of time, and always a hit. Start making these and watch how they become a hit with your family and friends.
Feel free to try new things with these no-bake cheesecake cups. As you get better, you’ll make desserts that look and taste amazing. All from your own kitchen!
FAQ
How far in advance can I make no-bake cheesecake cups?
You can make these creamy cheesecake bites 3-4 days ahead. Keep them fresh in an airtight container in the fridge. Add fresh toppings just before serving for the best look and taste.
Can I make these cheesecake cups gluten-free?
Yes, you can! Use gluten-free graham crackers or cookie crumbs instead. Most ingredients are naturally gluten-free, making these cheesecakes easy to adapt for different diets.
What are the best containers for serving no-bake cheesecake cups?
Mini dessert cups, mason jars, or small glass containers are great. They show off the cheesecakes’ layers and make serving easy.
How do I prevent my cheesecake filling from being too runny?
Make sure your cream cheese is soft before mixing. Whip the heavy cream until stiff, then gently mix it with the cream cheese. Chilling for 2-3 hours will help it set right.
Can I freeze no-bake cheesecake cups?
Yes, freeze them for up to 2 weeks. Wrap each in plastic wrap and store in a freezer-safe container. Thaw in the fridge before serving, and add toppings just before enjoying.
What are some unique topping ideas for these cheesecake cups?
Try fresh berries, caramel sauce, chocolate shavings, or crushed cookies. You can also use toasted coconut or edible flowers. These mini cheesecakes are perfect for any theme or taste.
How long can these cheesecake cups sit out at room temperature?
Keep them chilled because of the dairy filling. They should not be at room temperature for more than 2 hours to stay safe and fresh.
Can I use low-fat cream cheese in this recipe?
You can, but full-fat cream cheese tastes and feels better. Low-fat versions might be less creamy and stable.
Free Body Calculator – Know Your Body
Wondering if your body is in a healthy range? Use our Free Body Calculator to find out if you’re fit, normal, or need a lifestyle change. Get personalized tips, calorie targets, and your ideal protein, carbs, and fat intake – all in seconds.
Try Free Body Calculator Now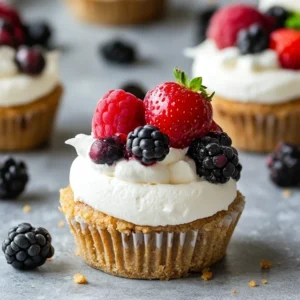
Quick and Easy No-Bake Cheesecake Cups – No Oven Required!
Ingredients
- For the Crust:
- 1 cup graham cracker crumbs
- 3 tbsp unsalted butter melted
- 2 tbsp granulated sugar
- For the Cheesecake Filling:
- 8 oz cream cheese softened
- 1 cup heavy cream
- ½ cup powdered sugar
- 1 tsp vanilla extract
- 2 tbsp lemon juice optional, for extra tang
- Toppings Optional:
- Fresh berries strawberries, raspberries, or blueberries
- Caramel sauce chocolate drizzle, or fruit compote

Instructions
- Prepare the Crust
- In a bowl, combine graham cracker crumbs, melted butter, and sugar. Stir until well mixed.
- Spoon about 2 tbsp of the crumb mixture into the bottom of each serving cup or jar. Press down firmly to form an even crust layer. Chill in the fridge while making the filling.
- Make the Cheesecake Filling
- In a large mixing bowl, beat softened cream cheese until smooth using an electric mixer.
- Gradually add powdered sugar, vanilla extract, and lemon juice (if using), and beat until combined and smooth.
- In a separate bowl, whip the heavy cream until stiff peaks form (about 2–3 minutes).
- Gently fold the whipped cream into the cream cheese mixture until fully incorporated.
- Assemble the Cheesecake Cups
- Spoon the cheesecake filling into the cups over the chilled crust layer, dividing it evenly among the cups.
- Smooth the top with a spoon or spatula.
- Chill
- Refrigerate the cheesecake cups for 2–4 hours, or until set.
- Add Toppings
- Just before serving, add fresh berries, caramel sauce, chocolate drizzle, or any topping of your choice.
Notes
- Make Ahead: These cheesecake cups can be made up to 2 days in advance and stored in the fridge.
- Flavor Variations: Swap out the vanilla extract for almond extract, or add a swirl of fruit jam into the filling for a different flavor.
- Crust Options: Use crushed Oreos or graham crackers with coconut for a twist.
1 thought on “Quick and Easy No-Bake Cheesecake Cups – No Oven Required!”
Comments are closed.