
Every kitchen holds a bit of magic especially when the scent of freshly baked bread rolls fills the air. I still remember standing in my grandmother’s kitchen, watching her turn the simplest ingredients into soft, golden rolls. They weren’t just bread they made every meal feel special, warm, and made with love.
Baking your own yeast bread is more than just making food. It’s about creating memories that warm both heart and home.
Creating bakery products from scratch might seem intimidating. But with the right guidance, anyone can master the art of bread rolls. Whether you’re preparing for a family dinner or wanting to impress guests, homemade bread rolls are a delicious way to elevate any meal.
This guide will walk you through every step of creating perfect bread rolls. You’ll learn how to select ingredients and achieve that ideal golden-brown crust. You’ll discover the secrets to soft, tender rolls that rival any professional bakery.
Key Takeaways
- Homemade bread rolls are simpler to make than you might think
- Fresh ingredients are crucial for delicious results
- Proper kneading and rising techniques make all the difference
- Temperature and timing are essential for perfect rolls
- Practice improves your bread-making skills
Essential Ingredients for Perfect Homemade Rolls
Making delicious dinner rolls begins with the right ingredients. Your bread recipes will stand out with high-quality components. Artisan bread needs careful ingredient selection for the perfect texture and flavor.
- All-Purpose Flour: The base of your bread recipe
- Active Dry Yeast
- Warm Milk
- Granulated Sugar
- Melted Butter
- Sea Salt
- Egg (optional)
Types of Flour for Bread Making
Choosing the right flour is key for your dinner rolls. All-purpose flour is good for most recipes. Bread flour adds chewiness. Whole wheat flour boosts nutrition and adds a nutty taste.
Understanding Yeast and Sugar
Yeast makes bread rise. It works with sugar to ferment, adding flavor and making rolls light. Sugar feeds the yeast, ensuring perfect rising.
The Role of Fat Components
Butter or oil do more than flavor your dinner rolls. They make the crumb tender and keep the bread soft. Melted butter adds richness and a golden-brown look that makes homemade rolls irresistible.
Equipment and Tools Needed for Bread Rolls
For great bread baking, you need the right tools and equipment. Before making delicious homemade bread rolls, get some key kitchen items. These will help make your baking smooth and fun.
Essential Mixing and Measuring Tools
Your bread baking journey begins with good measuring tools. You’ll need:
- Measuring cups (dry and liquid)
- Measuring spoons
- Kitchen scale (for precise ingredient measurements)
- Large mixing bowls
Mixing and Kneading Equipment
For bread rolls, consider these key tools:
- Stand mixer with dough hook attachment
- Hand mixer (alternative option)
- Wooden spoon
- Silicone spatula
Baking Essentials
To make your dough into golden, tasty bread rolls, you’ll need:
- Baking sheets
- Parchment paper
- Cooling rack
- Kitchen towels
While pro bread baking equipment is nice, many home bakers do great with basic tools. The most important things are your passion and patience!
Understanding Dough Consistency and Texture

Creating perfect bread loaves starts with understanding your bread dough’s fundamental characteristics. The right consistency can make or break your baking success. Your goal is to develop a dough that’s smooth, elastic, and ready to transform into delightful bread rolls.
Achieving the ideal bread dough requires careful attention to several key factors. The texture should be slightly tacky but not overly sticky. When you touch the dough, it should feel soft and pliable, with enough structure to hold its shape.
Proper Kneading Techniques
Kneading is crucial for developing gluten and creating the perfect bread texture. Here are some essential techniques:
- Use the heel of your hand to push and fold the dough
- Rotate the dough quarter-turn after each push
- Maintain a consistent rhythm and pressure
- Knead for 8-10 minutes by hand or 5-7 minutes in a stand mixer
Visual Cues for Perfect Dough
Recognizing when your bread dough is ready requires keen observation. Look for these signs:
- Smooth and elastic surface
- Springs back when gently pressed
- No longer sticky or rough
- Holds its shape without sagging
Windowpane Test Method
The windowpane test is a foolproof way to check dough development. Gently stretch a small piece of dough. If it stretches thin enough to see light through without tearing, your bread dough is perfectly kneaded and ready for the next stage.
Mastering the First Rise Process
The first rise, or bulk fermentation, is key in yeast bread baking. It turns raw dough into a tasty, airy treat. Learning this step can make you a better bread baker.
During the first rise, yeast starts working. It makes carbon dioxide, which fills your bread with air pockets. The right environment is important for good bread.
- Ideal rise temperature: 75-80°F (24-27°C)
- Recommended rise time: 1-2 hours
- Look for dough to double in volume
To get the best rise, you need to plan ahead. Here are some great places for your dough to rise:
- Warm, draft-free kitchen counter
- Turned-off oven with interior light on
- Sunny windowsill with indirect light
| Rising Location | Temperature Range | Pros |
|---|---|---|
| Kitchen Counter | 70-75°F | Consistent, easy to monitor |
| Oven with Light | 80-85°F | Controlled, warm environment |
| Sunny Windowsill | 75-80°F | Natural warmth, gentle rise |
Look for signs during the first rise. Your dough should puff up, get smooth, and grow a lot. Gentle poking should leave a slight indentation that slowly springs back. This means your yeast bread is ready for the next step.
Shaping Perfect Bread Rolls

Making beautiful bread rolls is key to making your bakery products stand out. The way you shape them affects their look, texture, and quality. It’s all about the details.
Getting good at shaping rolls takes time and learning the right techniques. You want your rolls to look the same and bake evenly. This makes them look like they came from a pro.
Rolling Techniques for Consistent Rolls
To make perfect bread rolls, use these expert methods:
- Divide your dough into equal portions using a kitchen scale for precision
- Use a gentle cupping motion with your hand to create smooth, round balls
- Roll each piece on a clean surface using light, consistent pressure
- Rotate the dough while rolling to maintain a symmetrical shape
Size and Uniformity Tips
To get consistent size in your bread rolls, pay close attention:
- Weigh each dough portion to ensure exact uniformity
- Use a gentle touch to maintain the dough’s air pockets
- Space rolls slightly apart to allow for expansion during baking
- Practice creates perfect symmetry in your bakery products
Remember, handling the dough gently is crucial. It keeps the dough’s structure intact. With practice, you’ll make beautiful, professional-looking rolls every time.
Second Rise and Proofing Methods
The second rise is key for making light and fluffy bread rolls. Your dough will change, getting complex flavors and the right texture. Learning about proofing can really improve your baking at home.
Proofing lets yeast keep working, making the dough bigger and more delicate. You need the right temperature and humidity for it to rise well.
- Room Temperature Proofing
- Cover bread dough with plastic wrap
- Place in a warm, draft-free area
- Allow 45-60 minutes for rising
- Refrigerated Slow Proofing
- Develops deeper flavor profiles
- Recommended for artisan bread techniques
- Extends proofing time to 8-12 hours
Figuring out when your dough is ready takes practice. Look for these signs:
| Proofing Stage | Visual Cues | Touch Test |
|---|---|---|
| Underproofed | Dense, compact appearance | Dough springs back quickly |
| Perfectly Proofed | Puffy, slightly expanded | Leaves gentle indentation when pressed |
| Overproofed | Collapsed, flat appearance | Dough does not spring back |
Getting good at the second rise takes time and effort. Try different methods to find what works best for your bread.
Baking Temperature and Timing Guidelines
Getting your bread baking just right means paying attention to temperature and timing. The right steps can turn your homemade bread into something truly special. Knowing how to use your oven and watching for visual signs will help you make beautiful, tasty bread rolls every time.
Optimal Oven Settings for Bread Rolls
It’s key to preheat your oven before baking. Set it to 350°F (175°C) and let it get hot before putting in your rolls. This ensures they bake evenly and get a lovely golden crust.
- Preheat oven to 350°F
- Use a low-middle rack position
- Rotate pan halfway through baking
Timing Your Baking Process
The time it takes to bake bread rolls can change based on their size and your oven. Usually, they need 20 to 25 minutes to be just right. Look out for these signs of a well-baked roll:
| Visual Indicator | What to Look For |
|---|---|
| Color | Golden brown surface |
| Crust | Crisp exterior with slight sheen |
| Sound | Hollow sound when tapped on bottom |
Oven Positioning Techniques
Where you place your rack in the oven matters a lot. A low-middle rack helps with even heat distribution, avoiding burnt bottoms or centers that are not cooked enough. Also, turn your baking sheet halfway through to get even browning.
Every oven is different. Get to know its quirks and adjust your baking method. With practice and patience, you’ll get better at making perfect homemade rolls.
Bread Rolls Variations and Flavors

Take your bread recipes to the next level by trying new flavors. These can turn simple rolls into amazing treats. The key is to add ingredients that excite your taste buds.
Savory variations can make your bread rolls stand out. Here are some tasty ideas:
- Cheese-infused rolls with freshly grated cheddar or Parmesan
- Herb-enhanced rolls featuring rosemary, thyme, or basil
- Garlic and roasted onion rolls for a robust flavor profile
- Sun-dried tomato and olive rolls for Mediterranean flair
For sweet bread recipes, try these sweet additions:
- Cinnamon and brown sugar rolls
- Dried fruit variations like cranberry or raisin
- Chocolate chip rolls for a decadent treat
- Honey and walnut combination rolls
When making your bakery products, remember texture is key. Use whole grain flours, seeds, and nuts for extra depth and nutrition. Feel free to mix ingredients to make rolls that wow everyone.
Storage and Freezing Instructions
Keeping your freshly baked goods fresh is key. The right storage keeps your homemade bread rolls tasty and soft.
For bread loaves eaten in 2-3 days, room temperature storage is best. Store them in a bread box or sealed plastic bag. Don’t place bread in direct sunlight or near heat.
- Use airtight containers to prevent moisture loss
- Store bread rolls at room temperature for short-term preservation
- Keep bread away from humid environments
Freezing is great for longer storage of bread loaves. Your homemade treats can stay fresh in the freezer for up to two months.
Freezing instructions for bread rolls:
- Allow rolls to cool completely before freezing
- Wrap individual rolls in plastic wrap or aluminum foil
- Place wrapped rolls in a freezer-safe bag
- Remove excess air to prevent freezer burn
Pro tip: Label your freezer bag with the date of freezing to track freshness.
To enjoy your frozen bread rolls, thaw them at room temperature for 1-2 hours. For a fresh taste, warm them in the oven at 350°F for 5-7 minutes before serving.
Common Troubleshooting Tips
Every home baker faces challenges when making yeast bread. Knowing how to fix common problems can make baking much better.
Fixing Dense or Heavy Rolls
Dense bread rolls can come from a few main issues. Here are some things to check:
- Expired or inactive yeast
- Insufficient kneading time
- Too much flour in the dough
- Low room temperature during rising
To avoid dense rolls, always check your yeast’s freshness. Test your yeast by mixing it with warm water and a bit of sugar. If it doesn’t foam in 10 minutes, it’s time for new yeast.
Addressing Rise Issues
Getting your rolls to rise right is key for light, airy bread. If your rolls aren’t rising, try these tips:
- Make sure your place is warm and draft-free
- Use fresh, active yeast
- Give the dough enough time to rise
- Check the water’s temperature (it shouldn’t be too hot)
Professional bakers know baking bread needs patience and care. By understanding these common issues, you’ll make perfect homemade rolls every time.
Make-Ahead and Preparation Strategies
Busy home bakers can make dinner rolls easier with smart make-ahead tips. Preparing bread recipes ahead of time saves time and reduces stress. Your homemade rolls will be ready before your guests arrive, ensuring fresh, warm bread.
Refrigeration is key for bread recipes. You can make your dinner rolls dough up to a day ahead. Just follow these steps:
- Prepare the dough completely
- Shape the rolls in your baking pan
- Cover tightly with plastic wrap or foil
- Refrigerate overnight
When ready to bake, take the rolls out of the fridge. Let them sit at room temperature for 45-60 minutes. This lets the dough warm up and rise before baking.
Freezing is also great for bread recipes. Unbaked dinner rolls can be frozen for up to one month. Wrap them well to prevent freezer burn and keep their texture.
Pro tip: Label your prepared dough with the date and type of rolls. This keeps track of your make-ahead creations. It ensures you always have fresh, homemade bread ready to impress.
Conclusion
Making homemade bread rolls is more than just cooking. It’s a way to connect with bakers from the past. By following the tips in this guide, you can turn simple ingredients into delicious artisan bread rolls. These will surely impress your family and friends.
Baking bread rolls from scratch is a rewarding experience. It’s better than buying them from a store. With each batch, you’ll get better at making dough, letting it rise, and baking. You’ll feel more confident with every roll that comes out golden and perfect.
We encourage you to dive into this baking journey. Try different flours and flavors to find your own style. Share your bread with others, exchange tips, and keep improving your skills. Your kitchen is now a place where you can create delicious, handcrafted bread rolls that show your passion and creativity.
Remember, making great bread is not just about following a recipe. It’s about enjoying the journey and making something special with your own hands. Start baking, keep learning, and enjoy every part of your bread roll adventure.
FAQ
What type of flour is best for making bread rolls?
How do I know if my yeast is still active?
Can I make bread rolls without a stand mixer?
How long should I let bread rolls rise?
What’s the windowpane test for bread dough?
How can I add flavor to basic bread rolls?
What’s the best way to store homemade bread rolls?
Why are my bread rolls dense and heavy?
Can I prepare bread roll dough in advance?
What temperature should I bake bread rolls at?
Free Body Calculator – Know Your Body
Wondering if your body is in a healthy range? Use our Free Body Calculator to find out if you’re fit, normal, or need a lifestyle change. Get personalized tips, calorie targets, and your ideal protein, carbs, and fat intake – all in seconds.
Try Free Body Calculator Now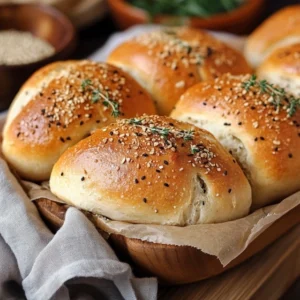
How to Make the Best Homemade Bread Rolls from Scratch
Ingredients
- 1 cup warm milk about 110°F / 43°C
- 2¼ tsp active dry yeast 1 packet
- 2 tbsp granulated sugar
- 3 tbsp unsalted butter melted
- 1 large egg
- 3¼ cups all-purpose flour plus more for dusting
- 1 tsp salt
- 1 tbsp melted butter for brushing after baking

Instructions
- Activate Yeast:
- In a small bowl, combine warm milk, sugar, and yeast. Stir and let sit for 5–10 minutes until foamy.
- Mix Dough:
- In a large mixing bowl (or stand mixer), combine yeast mixture, melted butter, egg, flour, and salt. Mix until a soft dough forms.
- Knead:
- Knead dough for 8–10 minutes by hand or 5–6 minutes in a mixer until smooth and elastic. Add a bit of flour if too sticky.
- First Rise:
- Place dough in a greased bowl, cover with a clean towel or plastic wrap, and let rise in a warm place for 1 hour or until doubled.
- Shape Rolls:
- Punch down dough, divide into 12 equal pieces, and shape into balls. Place in a greased 9×13 inch pan or baking sheet.
- Second Rise:
- Cover and let rise again for 30–45 minutes until puffy.
- Bake:
- Preheat oven to 375°F (190°C). Bake for 15–18 minutes, until tops are golden brown.
- Finish:
- Brush warm rolls with melted butter and cool slightly before serving.
Notes
- Want them sweeter? Add an extra tablespoon of sugar.
- For extra pillowy rolls, replace ¼ cup of the flour with potato flakes or use bread flour.
- These freeze beautifully after baking—wrap tightly and reheat in the oven.