
Ever wondered why the cherry cheese danish is the top sweet breakfast treat? It turns a regular morning into a special culinary adventure.
Picture biting into a flaky pastry that shows off creamy cheese and sweet cherry filling. The cherry cheese danish is more than a simple pastry. It’s a tasty journey that excites your taste buds and makes breakfast better.
This favorite cream cheese pastry mixes the smoothness of cream cheese with cherries’ sweet taste. It’s all wrapped in layers of buttery, golden puff pastry. Every bite is a mix of textures and tastes that makes your morning special.
Key Takeaways
- Cherry cheese danish offers a perfect balance of sweet and creamy flavors
- Puff pastry provides a delicate, flaky texture
- Ideal for breakfast or as a delightful dessert
- Easy to prepare with minimal ingredients
- Versatile pastry that can be customized with different fillings
The History and Origins of Danish Pastries
Danish baked goods have a rich history that spans continents and cultures. Their story starts in Vienna’s kitchens and later became a favorite in Denmark. Now, they are a beloved breakfast treat in America.
An elegant Danish pastry bakery in a quaint European town, with a warm orange glow from the brick ovens and the morning light filtering through the windows. The foreground features a display of freshly baked pastries, their flaky golden crusts and rich fillings of fruit and cream. In the middle ground, a master baker in a traditional white apron and toque carefully arranges the pastries, showcasing their craftsmanship. The background depicts a charming street scene, with cobblestones, flower boxes, and ivy-covered buildings, conveying the timeless heritage of this beloved baked treat.
The roots of Danish pastries lie in European baking traditions. In the 19th century, Austrian bakers introduced a new dough technique. Danish bakers then took this method and made it their own, creating the classic Danish pastry we know today.
From Vienna to Denmark: A Journey of Pastry Evolution
The change was amazing. Danish bakers made the Austrian technique lighter and more delicate. They turned it into a national treasure, known for its buttery, flaky layers that melt in your mouth.
- Original Austrian technique introduced in the 19th century
- Danish bakers refined the laminated dough method
- Developed a unique, lighter pastry style
How Danish Pastries Became an American Breakfast Staple
The story of Danish pastries in America is fascinating. Immigrant communities introduced these treats to American tastes. Racine, Wisconsin became a key place for Danish influence. By 1920, it was known as the most Danish city outside Denmark.
Bakeries like O&H Danish Bakery, started in 1949, helped make Danish pastries popular. Their three-day process for making traditional pastries made them a beloved American breakfast item.
Today, Danish pastries are still a hit, blending European baking with American creativity.
What Makes a Cherry Cheese Danish Special

A delectable cherry cheese Danish pastry, freshly baked, resting on a white plate. The golden, flaky exterior gives way to a rich, creamy filling of soft cream cheese and sweet cherry preserves. Warm vanilla and buttery notes waft through the air, creating an inviting aroma. Soft, diffused lighting illuminates the pastry, highlighting its intricate layers and textures. The composition is centered, allowing the Danish to take center stage, against a subtly blurred, neutral background that keeps the focus on the star of the scene.
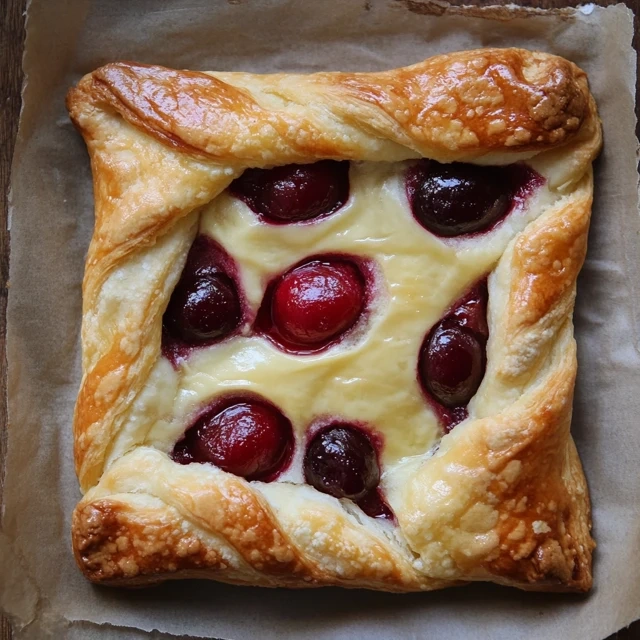
A cherry cheese danish is a top pick among fruit-filled pastries. It combines flaky puff pastry with a creamy filling and juicy cherries. This treat is special because of its rich flavors and beautiful look.
The secret to a cheese danish is its parts:
- Flaky Pastry Layer: Golden-brown and crisp, creating a delicate foundation
- Cream Cheese Filling: Smooth and tangy, providing a luxurious texture
- Cherry Preserve Topping: Sweet-tart burst of fruity flavor
When you eat a cherry danish, you get a mix of textures. The outside is crispy, while the inside is creamy and cheesy. The cherries add a sweet and tangy taste.
Bakers make these pastries with great care. They use special techniques to make sure the pastry, cheese, and cherries are just right. This makes each danish a unique treat.
One serving has about 275 calories, making it a guilt-free pleasure. Enjoy it with coffee in the morning or as a snack later. The cherry cheese danish is a favorite among pastry lovers.
Essential Ingredients for the Perfect Cherry Cheese Danish
Making delicious cream cheese pastries starts with the right ingredients. Cherry cheese danish is loved for its taste. Choosing the right parts is key to a tasty treat.
Selecting Quality Puff Pastry
The base of a great danish is top-notch puff pastry. You can pick from two main choices:
- Store-bought frozen puff pastry sheets
- Homemade laminated dough
Cream Cheese and Cherry Filling Components
For a real cherry cheese danish, you need the right stuff:
| Ingredient | Quantity |
|---|---|
| Cream Cheese | 8 oz brick |
| Sugar | 1/4 cup |
| Vanilla Extract | 1/2 teaspoon |
| Cherry Pie Filling | 1/2 (15 oz) can |
Additional Ingredients and Substitutions
Being flexible is important when making your danish. Here are some options:
- Try vegan cream cheese for special diets
- Use blueberry or raspberry instead of cherry
- Play with different sweeteners
Pro tip: Chill your cream cheese mix for 15 minutes before putting it together. This helps your danish turn out better.
Step-by-Step Preparation Guide
Making delicious bakery pastries like a cherry cheese danish needs precision and care. Your homemade danish baked goods will wow family and friends with these detailed steps.
Before you start, collect all ingredients and make sure your kitchen is clean and organized. Here’s a detailed guide to making the perfect cherry cheese danish:
- Prepare the Puff Pastry
- Roll out cold puff pastry on a lightly floured surface
- Keep pastry chilled to maintain its flaky texture
- Cut into even rectangular shapes
- Create the Cream Cheese Filling
- Blend softened cream cheese with sugar
- Add vanilla extract for enhanced flavor
- Mix until smooth and creamy
For the cherry component, you’ll want to make a rich filling that goes well with the cream cheese.
| Ingredient | Quantity | Preparation Note |
|---|---|---|
| Fresh Cherries | 2 cups | Pitted and halved |
| Granulated Sugar | 1/2 cup | Adjust to taste |
| Cornstarch | 2 tablespoons | For thickening |
When assembling your danish, carefully spread the cream cheese mixture and top with cherry filling. Create a braided effect by cutting strips on the sides and folding them alternately.
Bake your cherry cheese danish at 350°F for 14-16 minutes until golden brown. Let cool slightly before serving to allow fillings to set.
Tips for Achieving the Perfect Texture and Flavor

Making the ultimate cherry cheese danish needs precision and care. These breakfast pastries require skill to turn simple ingredients into a tasty treat. They should match the quality of professional bakeries.
Learning to make cheese danish involves mastering key baking techniques. These techniques can take your pastry from good to amazing.
Temperature Control Techniques
Getting your danish right depends on managing temperature well. Remember these important tips:
- Refrigerate cream cheese until just before mixing to keep it right
- Use butter that’s cool but slightly soft for the best pastry texture
- Preheat your oven to exactly 400℉ for consistent baking results
Proper Filling Distribution Methods
Evenly spreading the cherry and cream cheese filling is key. It makes sure every bite of your danish is balanced.
- Use about 1 tablespoon of cherry pie filling per pastry
- Create a slight well in the cream cheese mixture to prevent overflow
- Leave a small border around the edges to prevent leakage
Baking Time and Temperature Guidelines
| Baking Parameter | Recommended Setting |
|---|---|
| Oven Temperature | 400℉ |
| Baking Time | 16-18 minutes |
| Cooling Time | 5-10 minutes |
Pro tip for cherry danish lovers: Keep an eye on your pastry in the last minutes of baking. A golden-brown color means it’s perfectly baked. It will have a delightful, flaky texture.
Serving Suggestions and Presentation Ideas
Turn your Cherry Cheese Danish into a stunning centerpiece. It will impress your guests. These dessert pastries are versatile and can be served in many ways.
- Dust with powdered sugar for an elegant finish
- Drizzle with vanilla glaze for extra sweetness
- Garnish with fresh cherries or mint leaves
- Serve on decorative plates with a complementary beverage
The temperature of your danish matters. You can serve Cherry Cheese Danish:
- Warm – highlighting the gooey cream cheese filling
- Room temperature – maintaining optimal texture
- Slightly chilled – for a refreshing twist
Pairing suggestions can make your danish even better. Try serving with:
- Freshly brewed coffee
- Earl Grey tea
- Light sparkling wine for brunch
- Cold milk for a classic combination
Remember, presentation is key. Arrange your Cherry Cheese Danish thoughtfully. This will create a memorable culinary moment that delights both the eyes and taste buds.
Storage and Freshness Tips
Enjoying your delicious bakery pastries doesn’t end after baking. Proper storage is key to keeping your homemade breakfast pastries fresh. Learn how to keep your cherry cheese danish tasty for days after baking.
Proper Storage Methods
Keeping your cherry cheese danish fresh requires careful storage. Here are some effective ways to keep your pastries at their best:
- Room Temperature Storage
- Store in an airtight container
- Keep for 1-2 days maximum
- Protect from direct sunlight
- Refrigeration Techniques
- Wrap individually in plastic wrap
- Place in sealed container
- Refrigerate up to 5 days
- Freezing Options
- Wrap tightly in freezer-safe wrap
- Store up to 2 months
- Thaw overnight in refrigerator
Reheating Guidelines
Bring your refrigerated or frozen cherry cheese danish back to life with these reheating methods:
| Reheating Method | Temperature | Time | Result |
|---|---|---|---|
| Microwave | High | 15-20 seconds | Quick warm-up |
| Toaster Oven | 300°F | 5-7 minutes | Crisp texture |
| Conventional Oven | 300°F | 5-7 minutes | Restored freshness |
Pro tip: Always check your pastries for signs of spoilage before consuming. Look for any unusual odors, mold, or significant texture changes. If unsure, it’s best to discard the pastry for food safety.
Variations and Creative Twists
Make your cream cheese pastries exciting with new twists. Dessert pastries are very flexible. You can try different flavors and looks.
Here are some creative ideas for your fruit-filled pastries:
- Seasonal Fruit Variations
- Summer: Fresh peach or mixed berry filling
- Fall: Spiced pumpkin cream cheese variation
- Winter: Cranberry and orange zest combination
- Flavor Enhancement Techniques
- Add lemon zest to cream cheese base
- Incorporate almond extract
- Sprinkle cinnamon for warmth
Be creative with your pastry shapes. Try braided danishes, round pastries, or danish “sandwiches.” It’s a great way to show off your skills.
| Variation Type | Flavor Profile | Preparation Time |
|---|---|---|
| Blueberry Cream Cheese | Tangy and Sweet | 40 minutes |
| Apricot Almond | Nutty and Fruity | 45 minutes |
| Chocolate Swirl | Rich and Decadent | 50 minutes |
Baking is all about trying new things. Mix flavors, try new fruits, or add spices to your pastries. You might create a new family favorite!
Conclusion
Your journey into the world of cherry cheese danish has shown you a tasty breakfast treat. It comes from Europe and is now a favorite in America. This pastry is more than just food; it’s a celebration of taste and tradition.
Making a cherry cheese danish at home lets you be creative in the kitchen. You’ve learned how to pick the best ingredients and control the temperature. This means you can make delicious pastries right in your kitchen. It’s perfect for a special breakfast or a fancy dessert.
The cherry cheese danish is simple yet versatile. With what you’ve learned, you can try new fillings and techniques. Each bite is a story of baking skill, connecting you to a long tradition of delicious food.
Start baking and let the smell of a cherry cheese danish guide you. Your kitchen is ready to make amazing treats. This recipe will become a favorite in your collection.
FAQ
What exactly is a Cherry Cheese Danish?
A Cherry Cheese Danish is a tasty pastry. It has flaky puff pastry, creamy cheese, and sweet cherries. The cream cheese and cherries are wrapped in a golden, buttery pastry.
Are Cherry Cheese Danishes difficult to make at home?
Cherry Cheese Danishes might look hard, but they’re doable at home. Use quality puff pastry and follow a clear method. With patience, you can make them just like a bakery.
Can I use frozen or canned cherries for my Danish?
Yes, you can use frozen, canned, or fresh cherries. Frozen and canned cherries are easy and tasty. Just drain the liquid to keep the pastry flaky.
How long can I store a Cherry Cheese Danish?
At room temperature, they last 1-2 days in an airtight container. In the fridge, they can last 4-5 days. You can freeze them for up to a month, wrapped tightly.
Are there dairy-free or vegan alternatives for Cherry Cheese Danish?
Yes! Use vegan cream cheese and plant-based puff pastry for dairy-free versions. This way, everyone can enjoy the pastry, no matter their diet.
What are some creative variations of the classic Cherry Cheese Danish?
Try different fruits like blueberry or apricot. Add lemon zest or cinnamon to the cream cheese. You can also change the shape and presentation to make it your own.
What’s the best way to reheat a Cherry Cheese Danish?
Reheat in a 350°F oven for 5-7 minutes. This keeps the pastry flaky. If you’re short on time, the microwave works, but it’s less crisp. Cover with a paper towel to prevent drying.
Can I prepare Cherry Cheese Danish in advance?
Yes, you can make them ahead. Assemble and refrigerate for up to 24 hours, or freeze for longer. Bake straight from the fridge or freezer, adjusting times as needed.
Free Body Calculator – Know Your Body
Wondering if your body is in a healthy range? Use our Free Body Calculator to find out if you’re fit, normal, or need a lifestyle change. Get personalized tips, calorie targets, and your ideal protein, carbs, and fat intake – all in seconds.
Try Free Body Calculator Now
The Best Cherry Cheese Danish Recipe for Breakfast or Brunch
Ingredients
- For the Danish Pastry:
- 1 sheet puff pastry thawed
- 4 oz cream cheese
- ¼ cup granulated sugar
- ½ teaspoon vanilla extract
- 1 tablespoon lemon juice
- 1 teaspoon lemon zest
- 1 egg for egg wash, beaten with 1 tablespoon water
- ¾ cup cherry pie filling
- For the Glaze:
- ½ cup powdered sugar
- 1 tablespoon milk
- ½ teaspoon vanilla extract

Instructions
- Step 1: Preheat And Prepare Puff Pastry
- Preheat oven to 400°F (200°C). Line a baking sheet with parchment paper.
- Roll out the puff pastry and cut into 8 equal squares.
- Step 2: Make the Cream Cheese Filling
- In a bowl, beat cream cheese, sugar, vanilla extract, lemon juice, and lemon zest until smooth.
- Step 3: Assemble the Danish
- Place a spoonful of cream cheese mixture in the center of each pastry square.
- Top with 1-2 tablespoons of cherry pie filling.
- Fold the corners slightly inward or leave open for a classic Danish look.
- Brush edges with egg wash for a golden finish.
- Step 4: Bake
- Bake for 18-20 minutes or until golden brown and puffed up.
- Let cool for 5 minutes before glazing.
- Step 5: Add the Glaze
- Whisk together powdered sugar, milk, and vanilla to form a smooth glaze.
- Drizzle over the warm Danishes.
Notes
- Make it extra flaky! Chill the assembled Danishes for 10 minutes before baking.
- Swap flavors! Try blueberry, raspberry, or apple pie filling instead of cherry.
- Storage: Store in an airtight container for up to 3 days or freeze for up to 2 months.